How To Fly an IFR Holding Pattern
by Russ Still
Published
Updated
 Holding patterns are one of the iconic parts of instrument flight. They're a bane for students, and most casual general aviation pilots pray that they won't get one. Moving map technology has greatly enhanced the pilot's ability to fly these procedures with accuracy and ease, but the loss of the visual display element can quickly put an instrument pilot into a highly challenging situation.
In a poll recently run on Facebook, instrument pilots were asked how well they could perform in a hold if they lacked a moving map. Roughly half of them stated that, given the hold, they could fly it, but "with imprecision and stress".
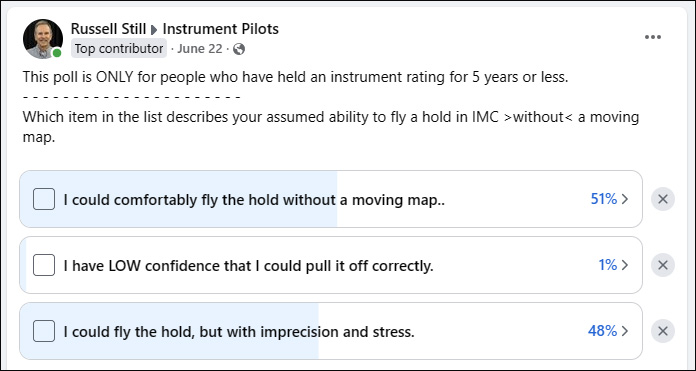
This metric supports what many instructors have long suspected: pilots attach too much of their confidence to the electronic magenta line.
The Anatomy of a Holding Procedure
The holding procedure is designed to "park" an aircraft in a specific area for some amount of time. This is generally the EFC or "expect further clearance" time. ATC might assign a hold because of traffic congestion ahead, or a hold might be executed during a missed approach procedure.
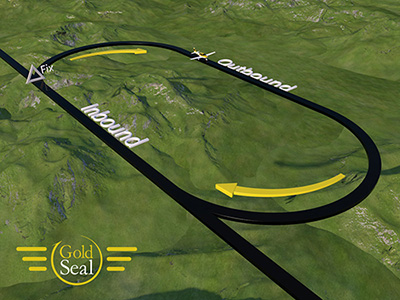
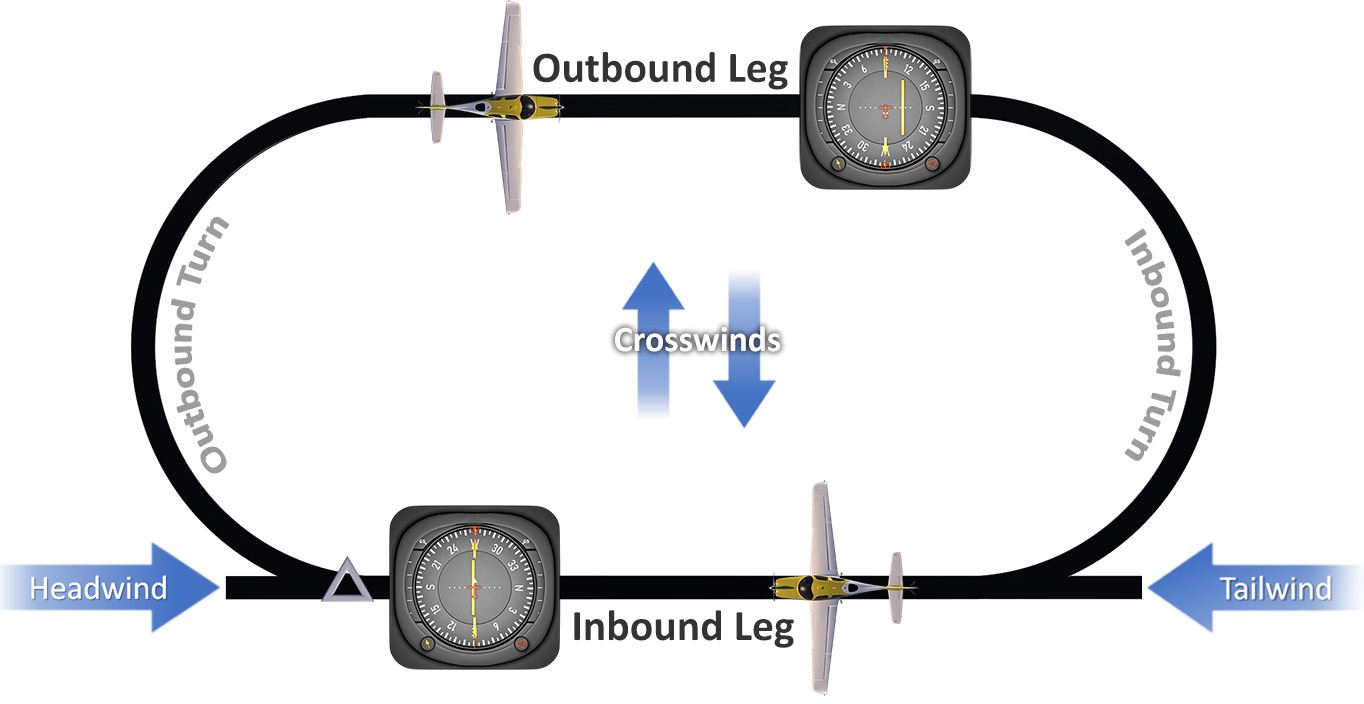
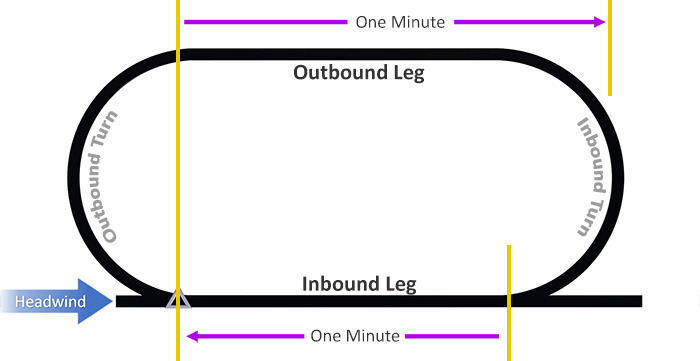
The holding pattern itself consists of a fix, an inbound leg to the fix, and a turning direction. Default turns are to the right. Below 14,000 feet, the standard length of the inbound leg, measured in time, is one minute. Standard holding patterns at these altitudes should take roughly four minutes to complete. Above 14,000 feet, the standard length of the inbound leg is one and a half minutes. In either case, the outbound leg is adjusted to produce the proper length/timing for the inbound leg.
All turns in a holding pattern should be standard rate. With a standard rate turn, it should take you one minute to turn 180 degrees.
FAA holding patterns exist in protected airspace. This protected airspace is calculated independently based on TERPs criteria, so that none of the protected airspace areas overlap. It's not practical for the pilot to know the precise dimensions of the protected airspace in the heat of battle. Abide by the rules and trust the system.
During training, the bulk of the practice involves learning how to enter the hold from various directions. The three standard hold entry types are direct, teardrop, and parallel. To enter the hold, the pilot flies to the fix and reports entering the hold to ATC. Next, he or she performs a direct, teardrop, or parallel transition to begin tracking the elliptical holding pattern.
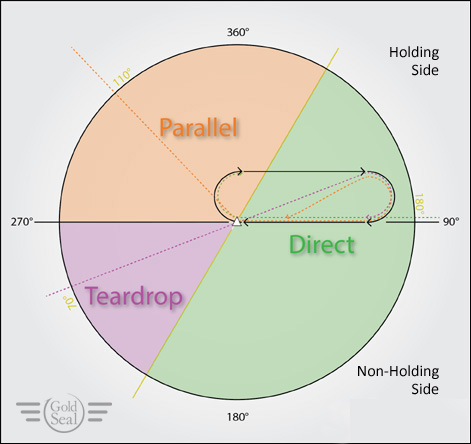
In real life, ATC doesn't care how you enter the holding pattern as long as you remain inside the protected area. The AIM states, "Holding protected airspace is designed based in part on pilot compliance with the three recommended holding pattern entry procedures. Deviations from these recommendations, coupled with excessive airspeed crossing the holding fix, may result in the aircraft exceeding holding protected airspace." So, proper use of direct, teardrop, or parallel entries is more than just a good idea. During instrument knowledge tests and checkrides, expect to conform to the three conventional types of pattern entries.
A lot of effort during training focuses on the selection and execution of the IFR hold entries. But in the real world, this is only half the battle. The real mark of a well-tempered hold involves properly dealing with the wind. Depending on the direction of the wind, a complex correction may be needed.
Defining the Holding Pattern
A holding pattern consists of four parts: the fix, the inbound leg, the inbound leg length, and the direction of turns. Unless specified as left-hand turns, the default is to the right. Some GPS navigators include "Hold at Waypoint" or "Hold at Present Position" options. This transforms unpublished holds into visual holds on the screen. Without these types of features, though, you'll need to navigate the hold in a more rudimentary fashion.
With an autopilot, you can fly to the fix in NAV mode, then change to HEADING mode for the outbound leg, followed by NAV mode again for the inbound leg. With or without an autopilot, after initially crossing the fix, change the GPS navigator to OBS mode with the inbound leg dialed in. This gives you the best visualization of the holding pattern when the entire pattern is not displayed.
How Wind Affects a Holding Pattern
Wind is almost always a factor when executing holding procedures. Although it might come from any direction, generally, it is either a headwind, tailwind, or crosswind component that concerns you. With a moving map display, it is easy enough to see your position on any part of the holding pattern. This makes wind correction easy. Without a moving map, though, the inbound leg and the fix are the only identifiable parts of the IFR hold. Wind correction during three-quarters of the procedure will be left up to your creative imagination. Miscorrections for strong winds, especially crosswinds, can quickly get you disoriented. In a worst case, it can even allow you to escape the protected area.
Holding Procedure with a Tailwind
Assuming the conventional one-minute inbound leg, ground speed will be increased. On the outbound leg, ground speed will be decreased because you'll be flying into the wind. You won't travel as far on the outbound leg in one minute. The problem is further exacerbated because the wind will stretch the outbound turn away from the pattern. Without compensating for this, the inbound turn will cause the airplane to intercept the inbound closer to the fix. It will thus take less than one minute.
To compensate, the outbound leg must be flown for longer than one minute in order to produce a one-minute inbound.
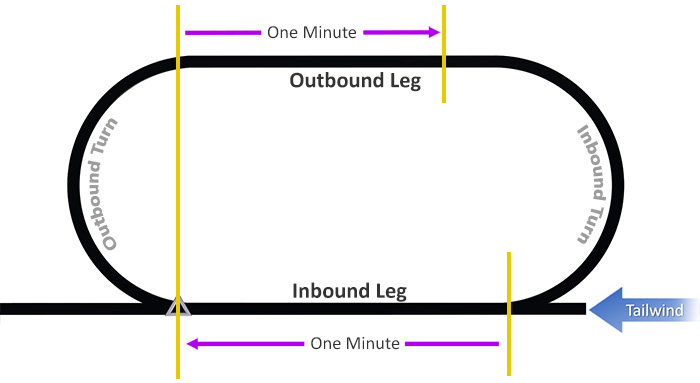
With a moving map, you would be able to easily see this on the display. But without one, you need to be aware of the need for a wind correction, and deduce an outbound leg that will result in a one-minute inbound.
Holding Procedure with a Headwind
A headwind provides a similar but opposite scenario in an IFR holding procedure. The headwind reduces ground speed on the inbound leg. This means less ground will be covered in one minute. The standard-rate outbound turn will get compressed as the wind pushes the airplane inward toward the holding pattern. Then, on the outbound leg, the tailwind will increase the ground speed. Without compensation, the outbound leg will be physically longer than the next inbound leg.
When flying inbound to the fix with a headwind, you'll need to be prepared to fly outbound a shorter distance, in terms of time. To produce a one-minute inbound leg, the outbound leg might need to be only 40 seconds (for example).
Holding Procedure with a Crosswind
This is where the real challenges begin. Depending on the direction of the crosswind, some fairly complicated corrections may be needed.
Assume right hand turns with the wind coming from the right. On the inbound leg you have guidance from the course needle (the CDI). This will allow you to crab into the wind (to the right) to remain on the straight inbound course line. So far, so good.
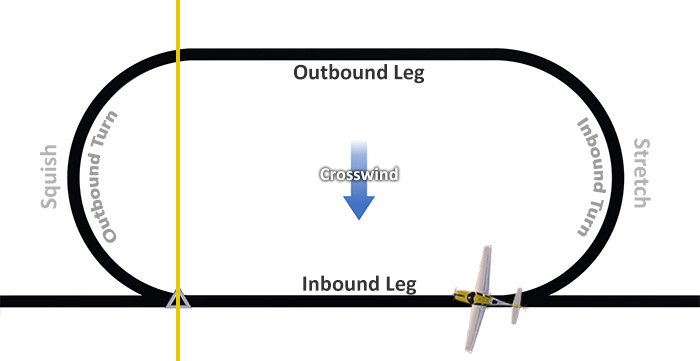
Entering the outbound turn, you will be turning into a headwind. Because of this, your ground track will be compressed back toward the inbound leg. As you complete the standard-rate turn, the wind will transform back into a crosswind. It will take the normal one minute of time to complete, but the turning radius will be reduced. Because of this, without correction, the airplane will be pushed back toward the inbound leg. This squishes the entire racetrack shape resulting in an inbound turn that will blow through the inbound leg.
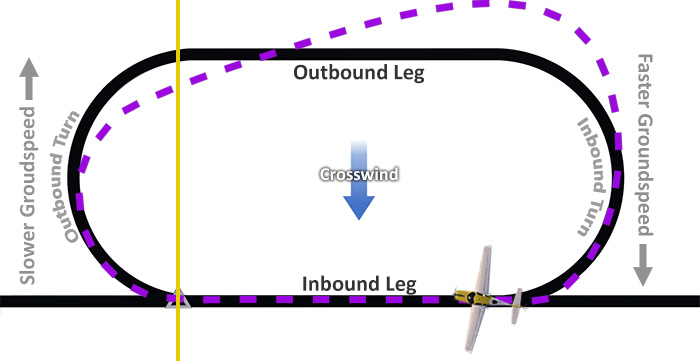
To ensure that you roll out on the inbound leg, you must add wind correction on the outbound leg. And not just the same amount (but opposite) that you used on the inbound. (That would keep you parallel to the inbound, but the expanded radius of the inbound turn would still cause you to overshoot the inbound course.) To be able to roll out of the standard-rate inbound turn onto the inbound leg, you would need to add even more crab angle into the wind. A good rule-of-thumb is to add triple the wind correction you used on the inbound leg.
Assume right hand turns with the wind coming from the left. On the inbound leg, as before, you have guidance from the course needle (the CDI). This allows you to crab into the wind (to the left) to remain on the straight inbound course line.
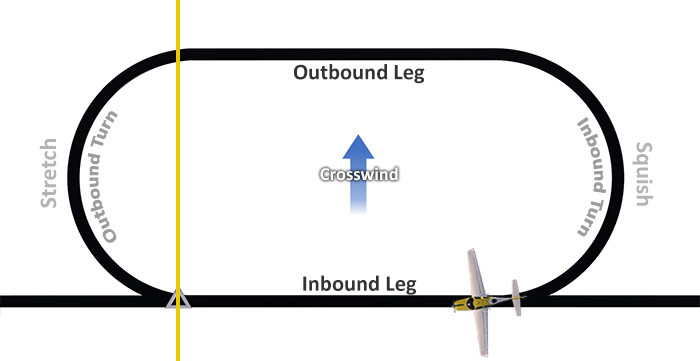
Entering the outbound turn, you will be turning away from the wind producing a tailwind. This will cause the standard-rate outbound turn to produce a stretched-radius ground track. When you roll wings level on the outbound leg, you will be farther from the inbound leg.
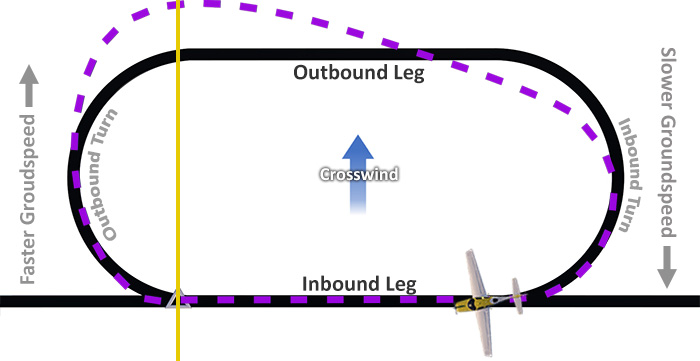
Without wind correction on the outbound leg, you will continue to get pushed farther away from the racetrack course. As before, you must add crab into the wind, and even more crab angle than you applied on the inbound leg. The extra correction angle anticipates the upcoming inbound turn which will be compressed by the resulting headwind.
Holding Pattern Summary
Considering that many general aviation aircraft DO have a moving map-depicted published holds, these wind corrections may not seem too concerning. After all, you can clearly see your ground track on the screen. But even with a moving map, an unpublished hold may still be a challenge without addressing proper wind correction.
Spend some quality time flying these holds in your mind, giving proper deliberation to the effects of wind. You'll be a better pilot for it.
To learn more about instrument holding patterns, view the holding procedures lessons in Section 4 of the Gold Seal Instrument Ground School.